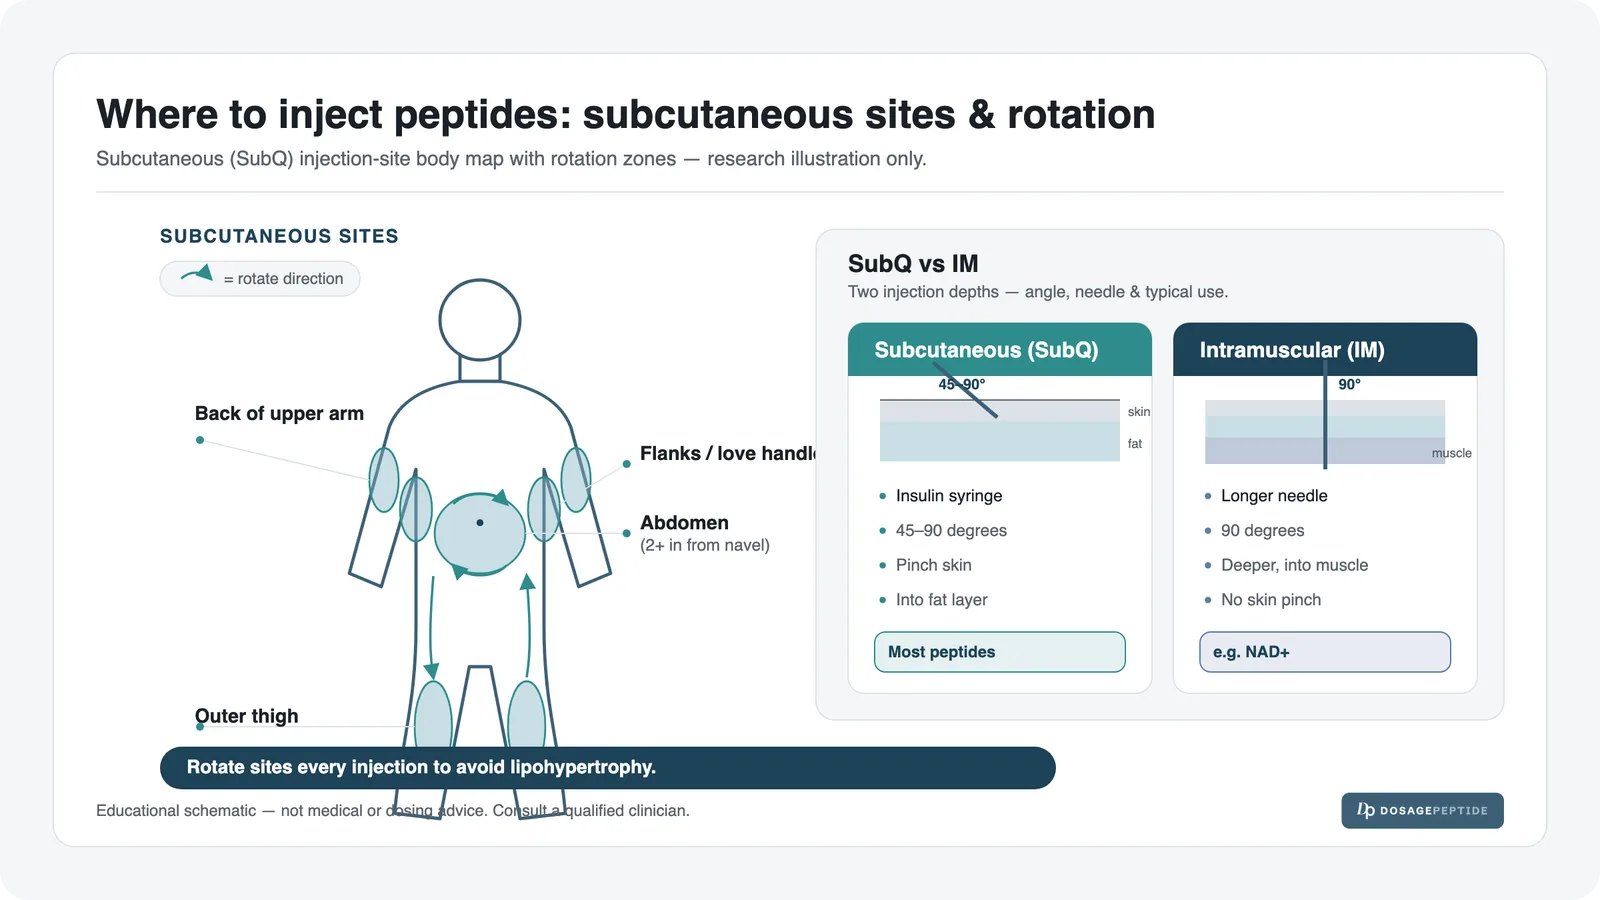
The three standard subcutaneous sites are the abdomen (at least two inches from the navel), the outer thigh, and the back of the upper arm. Rotate between them so the same spot is not used twice in a week, use a short ultra-fine needle (29–31 gauge, 8 mm or shorter), and inject at 45° to 90° depending on needle length and whether you pinch a skinfold. Most research peptides are subcutaneous; intramuscular is the minority case. Everything below is the detail behind those four sentences: the body-map, why rotation matters, how to pick the needle, and the clean-technique steps that keep a site usable for weeks.
This guide answers where to inject peptides in the way documented research protocols describe it: which route (subcutaneous vs intramuscular) each class of compound typically uses, a body-map of the standard subcutaneous zones and how to rotate through them, how to pick a needle, what angle and depth to use, and the clean-technique steps that keep a site usable for weeks. Because injection technique is a physical skill layered on top of the dosing math, it pairs directly with our peptide reconstitution guide and our insulin syringe units guide — reconstitute correctly, read the units correctly, then place the injection correctly.
One honest note on evidence up front: almost none of the research peptides discussed on this site have an FDA-approved human indication, and the injection-technique literature that is robust comes from decades of clinical diabetes education — subcutaneous insulin, site rotation, and lipohypertrophy prevention. We lean on that established technique literature because it is directly transferable to any small-volume subcutaneous injection. Everything here is general injection-technique information provided for research and educational purposes only. It is not medical advice, not a prescription, and not a recommendation to self-administer any substance.

At a Glance: Peptide Injection Technique
| Parameter | Typical documented approach |
|---|---|
| Most common route | Subcutaneous (SubQ) — into the fat layer just under the skin |
| When IM is discussed | Occasionally for higher-volume or specific compounds (e.g. NAD+); most peptides are SubQ |
| Standard tool | U-100 insulin syringe (100 units = 1 mL; 1 unit = 0.01 mL) |
| Typical SubQ needle | 29–31 gauge, 5/16″ (8 mm) or shorter; ultra-fine, short |
| SubQ angle | 45° to 90° depending on needle length and pinched skinfold |
| Primary sites | Abdomen (2+ inches from navel), flanks/love handles, outer thigh, upper arm/tricep |
| Rotation | Move ~1 inch from the last site each time; cycle across zones |
| Why rotate | Prevents lipohypertrophy (lumps), scarring, and erratic absorption |
| Sterility | Hand hygiene, alcohol swab, single-use needle every time, sharps container |
| Evidence base | Technique from clinical diabetes/SubQ literature; peptides themselves are research-use-only |
Use this table as the quick reference; each row is expanded in detail below. For the arithmetic of turning a milligram dose into a unit mark on the barrel, that lives in the dosing guides — this article is about the needle and the body.
Subcutaneous vs Intramuscular: Which Route, and Why
There are two injection routes that matter for peptide research handling: subcutaneous (SubQ) and intramuscular (IM). The difference is simply which tissue layer receives the material.
- Subcutaneous delivers into the subcutaneous fat — the soft layer between the skin (dermis) and the muscle. This is a low-blood-flow, high-capacity space that absorbs small volumes slowly and steadily. It is the route documented for the overwhelming majority of research peptides.
- Intramuscular delivers deeper, into muscle tissue, which is more vascular and absorbs faster. IM is standard for many conventional pharmaceuticals and vaccines, and it is occasionally discussed for higher-volume or specific research compounds. IM requires a longer needle and a different technique.
Why most peptides are described as SubQ. Reconstituted peptide doses are typically tiny volumes — often a fraction of the syringe. A dose of 0.03–0.6 mL fits comfortably in the subcutaneous space, where slow, steady absorption suits compounds meant to produce a physiological pulse or a sustained local effect. SubQ is also lower-skill, less painful, and lower-risk than IM: the fat layer has few large blood vessels and nerves, so the odds of a painful or bloody injection are lower. The standard U-100 insulin syringe was literally designed for small-volume subcutaneous delivery, which is why it is the default tool across the catalog.
When IM enters the conversation. A minority of protocols mention intramuscular delivery. NAD+ is the most cited example: it is a comparatively high-volume, sometimes uncomfortable injection that some research protocols describe delivering IM (or slow SubQ) rather than as a fast SubQ bolus. The general principle is that route follows volume and the compound’s absorption profile — larger volumes and compounds intended for rapid systemic uptake lean toward IM; small-volume peptides lean SubQ. Because route choice is compound-specific, always defer to the documented protocol for the exact compound rather than assuming.
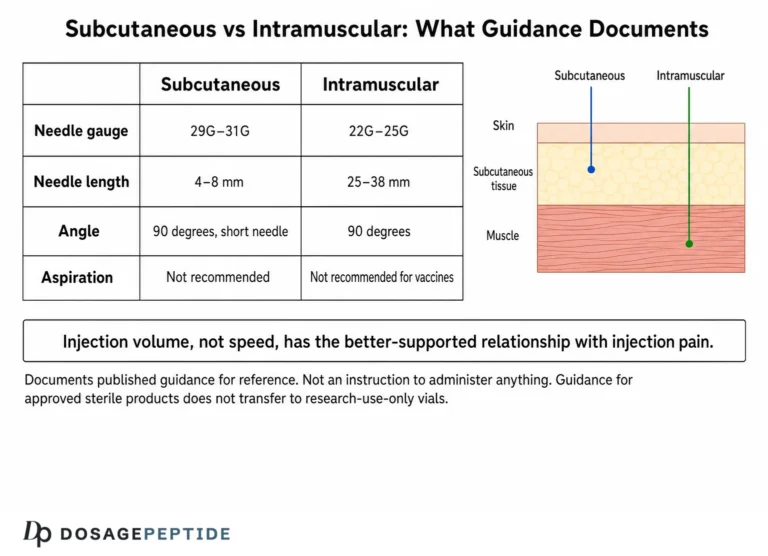
| Attribute | Subcutaneous (SubQ) | Intramuscular (IM) |
|---|---|---|
| Tissue layer | Fat under the skin | Muscle, below the fat |
| Typical needle | 29–31 G, 5/16″ (8 mm) or shorter | Longer needle (1″–1.5″), larger bore |
| Angle | 45°–90° (often into a pinch) | 90° into the muscle belly |
| Absorption | Slow, steady | Faster, more vascular |
| Volume tolerated | Small (fractions of a mL) | Larger volumes |
| Pain/skill | Low; beginner-friendly | Higher; needs anatomy knowledge |
| Most peptides | Yes — the default | Occasional (e.g. NAD+ discussions) |
The practical takeaway: unless a specific protocol says otherwise, the documented default for peptides is a small-volume subcutaneous injection with an insulin syringe. The rest of this guide focuses on that SubQ route, then returns to IM considerations at the end.
The Subcutaneous Body-Map: Where the Standard Sites Are
Subcutaneous injections work anywhere the body has a pinchable fat layer. Four zones dominate documented protocols because they are easy to reach, have generous fat, and are away from major vessels and nerves. Think of them as a body-map you cycle through.
| Zone | Exactly where | Notes |
|---|---|---|
| Abdomen | The belly, staying at least 2 inches (about two finger-widths) away from the navel in every direction | The most-used SubQ site: large surface area, easy pinch, consistent absorption. Avoid the immediate ring around the navel (dense tissue, more vessels). |
| Flanks / love handles | The sides of the lower torso, above the hip bone | Generous fat, easy to pinch, well away from organs. A natural extension of the abdominal field for rotation. |
| Outer thigh | The front-outer part of the upper thigh, roughly a hand’s width down from the hip and up from the knee | Good for self-administration; easy to see and pinch. Stay to the outer/front — avoid the inner thigh (more vessels). |
| Upper arm / tricep | The back of the upper arm, the fatty pad over the tricep | Works well but is harder to pinch on yourself; often easier with assistance. Good for adding variety to rotation. |
A simple mental picture of the body-map: imagine the front of the torso divided into a grid. The abdomen is the central field, the flanks are the two side panels, the outer thighs are the lower-left and lower-right anchors, and the tricep pads are the upper corners. You want to keep moving within and between these fields so no single square inch of skin gets injected twice in quick succession.
What to avoid across every zone:
- The 2-inch exclusion zone around the navel.
- Any skin that is bruised, red, hard, lumpy, scarred, heavily tattooed, or broken.
- Moles, visible veins, or bony areas — you want soft, pinchable fat, not skin over bone.
- The same spot as last time — even if it felt perfect.
A quick note on the idea of injecting near a site of interest: some recovery-oriented research practice describes placing a compound like BPC-157 subcutaneously close to the area being studied (for example, near a specific joint or soft-tissue region), on the theory of a more local effect, versus a general systemic SubQ site like the abdomen. This “local vs systemic” placement is a documented research practice pattern, not a proven clinical instruction — the evidence for meaningfully different outcomes by placement is limited and largely preclinical. Treat it as context, not a directive.
Why Rotation Matters (Lipohypertrophy and Beyond)
The single most important habit in subcutaneous technique is site rotation — deliberately moving the injection point each time so you never repeatedly hit the same tissue. This is the one lesson decades of clinical diabetes education hammer hardest, and it transfers directly.
The main problem rotation prevents is lipohypertrophy — firm, rubbery lumps of thickened fat and scar tissue that build up when the same spot is injected over and over. Lipohypertrophy is more than cosmetic:
- The lumps are less sensitive, so people gravitate back to them (they hurt less) — which makes the problem worse in a feedback loop.
- Absorption through scarred, thickened tissue becomes erratic and unpredictable, so the same drawn dose can behave inconsistently.
- The lumps can be slow to resolve and, in severe cases, semi-permanent.
Rotation also prevents ordinary local irritation, bruising, and micro-scarring from concentrating in one area, and it keeps each zone healthy and usable across a multi-week protocol.
A workable rotation scheme:
- Move at least ~1 inch (one finger-width) from the last injection every single time.
- Work systematically across one zone before moving to the next — e.g. march across the left abdomen in a grid, then the right, then the flanks, then thighs, then arms, then back to the start.
- Give any single spot roughly a week or more before returning to it, so tissue fully recovers.
- Keep a simple log (a note or a body-map diagram with an X marked each time) so you don’t drift back to favorites.
| Day | Example rotation target |
|---|---|
| Day 1 | Left abdomen, upper quadrant |
| Day 2 | Right abdomen, upper quadrant |
| Day 3 | Left abdomen, lower quadrant |
| Day 4 | Right abdomen, lower quadrant |
| Day 5 | Left flank / love handle |
| Day 6 | Right flank / love handle |
| Day 7 | Outer thigh (alternate legs) or tricep, then cycle back |
This is an illustrative pattern, not a dosing schedule — adapt the number of sites to how often a given research protocol is administered. The principle is constant: never inject the same square inch twice in a row, and give tissue time to recover.
Choosing a Needle: Gauge and Length
For subcutaneous peptide work, the tool is almost always a U-100 insulin syringe — a fixed, ultra-fine, short needle attached to a barrel graduated in insulin units. The reason it dominates is that the fixed needle is designed exactly for shallow, small-volume subcutaneous delivery, and its unit markings line up with how peptide doses are calculated.
Two specs describe any needle:
- Gauge (G) — the thickness. Higher number = thinner needle. A 31 G needle is thinner than a 29 G. Thinner needles hurt less and cause less trauma; the trade-off is they draw and push very viscous liquid a little slower (rarely an issue for watery reconstituted peptides).
- Length — how deep it reaches. SubQ needs to reach the fat layer, not the muscle, so short needles are used: commonly 5/16″ (8 mm) or shorter. Shorter needles reduce the risk of accidentally going intramuscular.
| Spec | Typical SubQ range | What it means |
|---|---|---|
| Gauge | 29 G – 31 G (some 32 G) | Thin; higher number = thinner, less painful |
| Length | 5/16″ (8 mm) or shorter | Reaches the fat layer, not the muscle |
| Barrel scale | U-100 (units) | 100 units = 1 mL; 1 unit = 0.01 mL |
| Use | Single-use only | One fresh needle per injection — never reuse |
The unit math you must be fluent in. On a U-100 syringe, the whole barrel of 100 units equals exactly 1 mL, so 1 unit = 0.01 mL. That single conversion is the bridge between the volume your dose works out to and the mark you draw to. For example, if a documented protocol’s dose works out to a draw of 0.10 mL, that is the 10-unit mark; 0.40 mL is the 40-unit mark. You never eyeball millilitres on an insulin syringe — you read units. The full worked arithmetic of converting a milligram dose into units, for every vial size, lives in our insulin syringe units for peptides guide, and the exact numbers for any specific vial and dose come out of the dosage calculator.
A dull, previously-used needle is both more painful and more traumatic to tissue, and reusing needles is a sterility failure. Fresh needle, every time.
Angle and Depth: Getting Into the Right Layer
The goal of a subcutaneous injection is to place the material in the fat layer — not shallower (into the skin, which stings and leaks) and not deeper (into muscle, which changes absorption and hurts more). Two things control that: the angle and whether you pinch.
- The pinch. Gently pinch up a fold of skin and fat between thumb and forefinger to lift the fat away from the underlying muscle. This creates a safe target and is especially helpful for leaner individuals where the fat layer is thin.
- The angle.
- 90° (straight in) works well with a short needle (like the 5/16″/8 mm insulin needle) into a pinched fold — the short length keeps it in the fat even going straight down.
- 45° is used with slightly longer needles or on leaner areas, angling the needle so it slides into the fat layer rather than punching through to muscle.
The general rule: shorter needle + pinch → 90°; longer needle or thin fat → 45°.
| Situation | Angle | Pinch? |
|---|---|---|
| Short insulin needle (5/16″/8 mm), average fat | 90° | Optional but recommended |
| Leaner build / thin fat layer | 45° | Yes — always pinch |
| Slightly longer needle | 45° | Yes |
| Generous abdominal/flank fat | 90° | Optional |
Depth is set by needle length, not by how hard you push. This is why choosing a short needle matters: an 8 mm or shorter needle into pinched fat physically cannot reach most people’s muscle. Insert in one smooth, deliberate motion (a quick, confident entry hurts less than a slow, hesitant one), deliver the dose steadily, then withdraw at the same angle you went in. Release the pinch after the needle is out.
Clean Technique, Step by Step
Sterility is not optional. A peptide is being placed under the skin, bypassing the body’s main barrier to infection, so aseptic technique is the difference between a clean site and an abscess. Here is the documented, standard sequence for a small-volume subcutaneous injection.
- Hand hygiene. Wash hands thoroughly with soap and water (or use an alcohol-based hand rub). This is the most under-rated step and the one most often skipped.
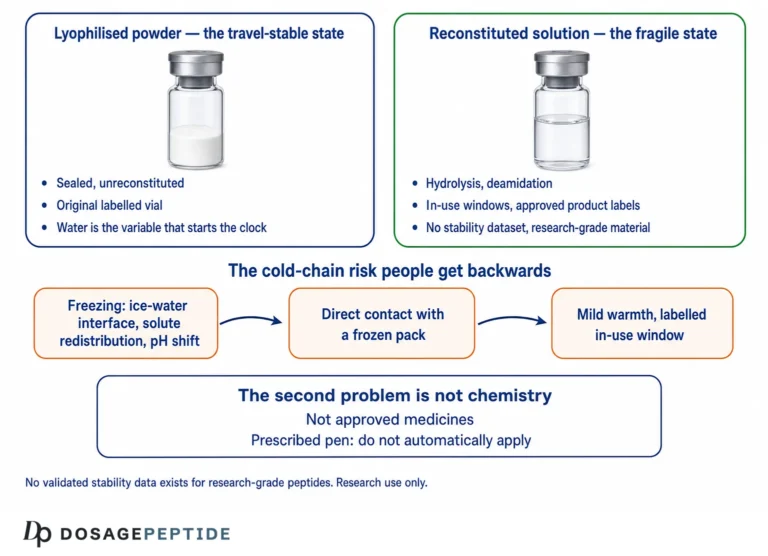
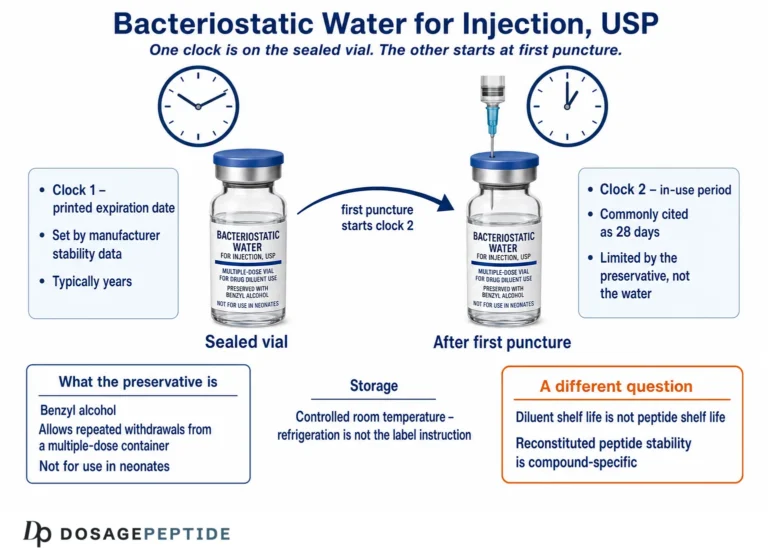
- Prepare the dose. Confirm the compound is properly reconstituted and stored (see the storage guide), and draw the correct number of units on the U-100 syringe. If you are unsure how much bacteriostatic water the vial should have been reconstituted with in the first place, that’s covered in our bacteriostatic water guide.
- Swab the vial stopper with a fresh alcohol wipe before drawing, and let it dry.
- Choose and swab the site. Pick the next site in your rotation, wipe it with a fresh alcohol swab in a circular motion, and let it dry completely — injecting through wet alcohol stings.
- Clear air bubbles. Hold the syringe needle-up, tap so bubbles rise, and push gently until a tiny drop appears at the tip. Small subcutaneous air bubbles are not dangerous the way IV air is, but clearing them ensures you deliver the full drawn dose accurately.
- Pinch (if using) and insert at the chosen angle in one smooth motion.
- Deliver the dose slowly and steadily by depressing the plunger fully.
- Withdraw at the same angle, release the pinch, and apply gentle pressure with a clean swab or gauze. Do not rub vigorously — light pressure only.
- Dispose immediately in a sharps container (below). Never recap by pushing the cap on with two hands.
The aspiration debate. “Aspiration” means pulling back slightly on the plunger after inserting, to check for a flash of blood (indicating you’ve hit a vessel) before injecting. For intramuscular injections in some traditions, aspiration is taught. For small-volume subcutaneous injections with a thin insulin needle into the fat layer, modern clinical guidance generally considers aspiration unnecessary — the subcutaneous fat has few large vessels, the needle is tiny, and aspiration adds handling. It is a genuine point of variation in practice; the mainstream position for SubQ insulin-type injections is that routine aspiration is not required. Knowing both positions lets you understand any protocol that mentions it.
Sharps Safety and Sterility
Every injection produces a contaminated sharp, and mishandling it is a real hazard — needle-stick injuries and infection risk. The rules are simple and non-negotiable:
- One needle, one use. Never reuse a needle — not on yourself, not on a later dose. Reuse dulls the needle, increases pain and tissue trauma, and breaks sterility.
- Never share needles, syringes, or vials.
- Dispose in a proper sharps container — a rigid, puncture-resistant, sealable container. Not a trash bag, not a soda bottle you’ll forget about.
- Do not two-hand recap. The classic needle-stick happens while recapping. Either don’t recap, or use a one-handed scoop; then drop straight into sharps.
- Keep everything single-use and clean: fresh alcohol swabs, fresh syringe, dried skin, clean hands.
- Inspect before use. Discard any syringe with a bent needle, any vial that looks cloudy, discolored, or contaminated, or anything past its handling window.
Sterility failures are the fastest route to a genuinely dangerous outcome — a local abscess or a systemic infection is far more serious than a bruise. Treat aseptic technique as the load-bearing safety layer of the entire process.
Intramuscular Considerations (the Minority Case)
Because most peptides are SubQ, IM is the exception rather than the rule — but it comes up, most notably around NAD+, where higher volume and comfort considerations lead some documented protocols to discuss intramuscular (or deliberately slow) administration instead of a fast SubQ bolus. If a specific protocol describes an IM route, the differences from SubQ are meaningful:
- Longer, larger needle to reach muscle (well beyond the 8 mm SubQ needle).
- 90° into the muscle belly, typically without a pinch — you want depth, not a lifted fold.
- Anatomy matters far more. IM sites (e.g. the deltoid, the vastus lateralis of the outer thigh, the ventrogluteal region) must be located correctly to avoid nerves and vessels. This is a higher-skill injection.
- Faster absorption from more vascular tissue.
The practical guidance is the same as everywhere on this site: follow the documented protocol for the specific compound. If a protocol says SubQ, use SubQ technique; if it discusses IM, understand that it is a different, higher-skill procedure with different anatomy. Don’t improvise a route the protocol doesn’t describe.
Putting It Together: A Pre-Injection Checklist
| Step | Check |
|---|---|
| 1. Dose correct? | Reconstituted right, correct units drawn on the U-100 syringe |
| 2. Hands clean? | Washed or alcohol-rubbed |
| 3. Fresh supplies? | New syringe, new swabs, sharps container ready |
| 4. Right site? | Next in rotation, ≥1 inch from last, healthy skin, ≥2 inches from navel |
| 5. Site swabbed & dry? | Alcohol wiped, fully dried |
| 6. Bubbles cleared? | Air tapped up and expelled |
| 7. Angle & pinch set? | 90° short needle / 45° longer needle; pinch if lean |
| 8. Deliver & withdraw | Smooth in, steady push, smooth out, gentle pressure |
| 9. Dispose safely | Straight into sharps; no two-hand recap |
| 10. Log the site | Mark the body-map so you rotate next time |
Reconstitute correctly, read your units correctly, place the injection correctly, rotate, and stay clean. Those five habits cover nearly everything that determines whether a research protocol runs smoothly over weeks. For the exact numbers behind any of it, the dosage calculator and the per-compound protocols in the full peptide dosage catalog are the reference of record.
Frequently Asked Questions
Routes and Sites
Where do you inject peptides? In documented research protocols, most peptides are injected subcutaneously — into the fat layer just under the skin — at one of four standard zones: the abdomen (staying at least 2 inches from the navel), the flanks/love handles, the outer thigh, or the fatty pad on the back of the upper arm. You rotate through these zones rather than using one spot.
What are the best subcutaneous injection sites for peptides? The abdomen is the most-used because it has generous fat, is easy to pinch, and absorbs consistently. The flanks, outer thighs, and triceps round out the rotation. The best site on any given day is simply the next one in your rotation that has healthy, pinchable, uninjured skin.
Is peptide injection subcutaneous or intramuscular? The default documented route for most peptides is subcutaneous. Intramuscular is the minority case, discussed mainly for higher-volume compounds like NAD+. Route should always follow the specific compound’s documented protocol.
Can I inject peptides into muscle instead of fat? Only if the specific protocol describes an IM route. IM is a deeper, higher-skill injection requiring a longer needle, correct anatomical landmarks, and a different technique. For a compound documented as subcutaneous, use subcutaneous technique — don’t substitute a route the protocol doesn’t call for.
Does it matter where on the body I inject for a systemic peptide? For compounds meant to act systemically, any of the standard SubQ zones works, which is exactly why rotation is fine. Some recovery research practice describes injecting a compound like BPC-157 near a specific area of interest for a more local effect, but the evidence that placement meaningfully changes outcomes is limited and largely preclinical — treat it as context, not instruction.
Needles, Angle, and Technique
What needle size do I use for subcutaneous peptide injections? The standard tool is a U-100 insulin syringe with a fine, short needle — commonly 29–31 gauge and 5/16″ (8 mm) or shorter. Higher gauge numbers are thinner and less painful; the short length keeps the injection in the fat layer rather than reaching muscle.
What angle should I inject peptides at? With a short insulin needle into pinched fat, 90° (straight in) is standard. On leaner areas or with a slightly longer needle, 45° is used so the needle slides into the fat rather than into muscle. The rule of thumb: short needle plus pinch → 90°; longer needle or thin fat → 45°.
Should I pinch the skin before injecting? Pinching a fold of skin and fat lifts it away from the underlying muscle, creating a safe subcutaneous target. It’s especially important for leaner individuals with a thin fat layer, and it’s a reasonable default for everyone. Release the pinch after the needle is withdrawn.
Do I need to aspirate before a subcutaneous peptide injection? For small-volume subcutaneous injections with a thin insulin needle, modern clinical guidance generally considers aspiration unnecessary — the fat layer has few large vessels. Aspiration is more associated with intramuscular technique. It’s a genuine point of practice variation, but the mainstream SubQ position is that routine aspiration isn’t required.
How many units is my dose on the syringe? On a U-100 syringe, 100 units = 1 mL, so 1 unit = 0.01 mL. Once you know the volume your dose works out to, multiply by 100 to get the unit mark (0.10 mL = 10 units; 0.40 mL = 40 units). The full conversion method is in the insulin syringe units guide, and the exact figure for a specific vial and dose comes from the dosage calculator.
Rotation, Safety, and Sterility
Why do I need to rotate injection sites? Repeatedly injecting the same spot causes lipohypertrophy — firm lumps of thickened fat and scar tissue that absorb erratically, hurt less (so people keep using them, worsening the cycle), and can be slow to resolve. Rotation prevents lumps, bruising concentration, and unpredictable absorption, keeping each zone healthy across a multi-week protocol.
How far apart should injection sites be? Move at least about 1 inch (a finger-width) from the last injection every time, and give any single spot roughly a week or more before returning to it. Working systematically across one zone in a grid before moving to the next makes this easy to track.
How do I avoid bruising and lumps? Rotate sites, use a fresh sharp needle every time, insert smoothly and confidently, avoid visible veins, apply gentle (not vigorous) pressure after withdrawing, and never inject into skin that’s already bruised, red, hard, or lumpy. Lumps that build up are the sign you’re not rotating enough.
How do I dispose of used needles? In a rigid, puncture-resistant, sealable sharps container — never loose trash. Don’t two-hand recap (the classic needle-stick moment), never reuse or share needles, and drop each used syringe straight into the container after use.
What are the biggest sterility mistakes to avoid? Skipping hand hygiene, reusing needles, injecting through wet alcohol (let it dry), sharing supplies, and using cloudy or contaminated vials. Because a subcutaneous injection bypasses the skin barrier, aseptic technique is the load-bearing safety step — an infection is far more serious than a bruise.
References
- Clinical diabetes-education references on subcutaneous injection technique, site rotation and lipohypertrophy prevention (general).
- Manufacturer references on U-100 insulin syringe gauges and lengths.
- General aseptic-technique references for injectable handling.
Research-use-only disclaimer. This article is provided strictly for research, educational, and informational purposes. It describes general injection-technique information and documented research handling practices; it is not medical advice, not a prescription, and not a recommendation to self-administer any substance. The peptides referenced are research compounds and are not FDA-approved for the uses discussed; the strongest injection-technique evidence cited here is drawn from established clinical subcutaneous-injection literature and is transferable technique context, not compound-specific clinical validation. Nothing here should be construed as instructing any individual to inject any substance. Consult a qualified, licensed healthcare professional before making any health decision.